Dealing with Musty Attic Smells During a Humid St. Louis Summer
The musty smell wafting from your attic during a St. Louis summer isn’t just unpleasant—it’s your home crying for help. That damp, earthy odor signals trapped moisture, poor ventilation, and conditions ripe for mold growth. In Missouri’s climate, where summer humidity regularly climbs above 70%, your attic becomes a breeding ground for problems that can destroy insulation, rot wood framing, and compromise your roof’s structural integrity.
St. Louis homeowners face unique challenges. Our location in the Mississippi River Valley means we experience some of the highest humidity levels in the Midwest. Combined with temperature swings that can exceed 40 degrees in a single day, your attic becomes a pressure cooker for moisture problems. The musty smell you notice isn’t just a nuisance—it’s often the first warning sign of serious structural issues developing above your ceiling.
Before that smell turns into visible mold or water damage, you need to understand what’s happening and take action. This guide walks you through the causes, the science behind attic moisture, and the proven solutions that work in St. Louis homes specifically. Hail Damage Assessment.
Common Symptoms of Attic Moisture Problems
Recognizing attic moisture issues early can save you thousands in repairs. Here’s what to look for during your next inspection: EPA Mold Guidelines.
- Damp insulation – Insulation that feels heavy, clumpy, or has dark spots indicates moisture absorption
- Dark stains on plywood – Black or dark gray discoloration on roof sheathing suggests mold or mildew growth
- Condensation on rafters – Water droplets forming on wood surfaces during temperature changes
- Musty odor – That characteristic damp, earthy smell that intensifies during humid weather
- Peeling paint on ceiling – Interior ceiling paint bubbling or peeling from moisture buildup
- Increased allergy symptoms – Family members experiencing worsened respiratory issues when indoors
The diagnostic process starts with a simple visual inspection. Grab a flashlight and check your attic during mid-morning when temperatures begin rising. Look for these warning signs and pay attention to how the air feels—is it stagnant and heavy, or does it move freely?
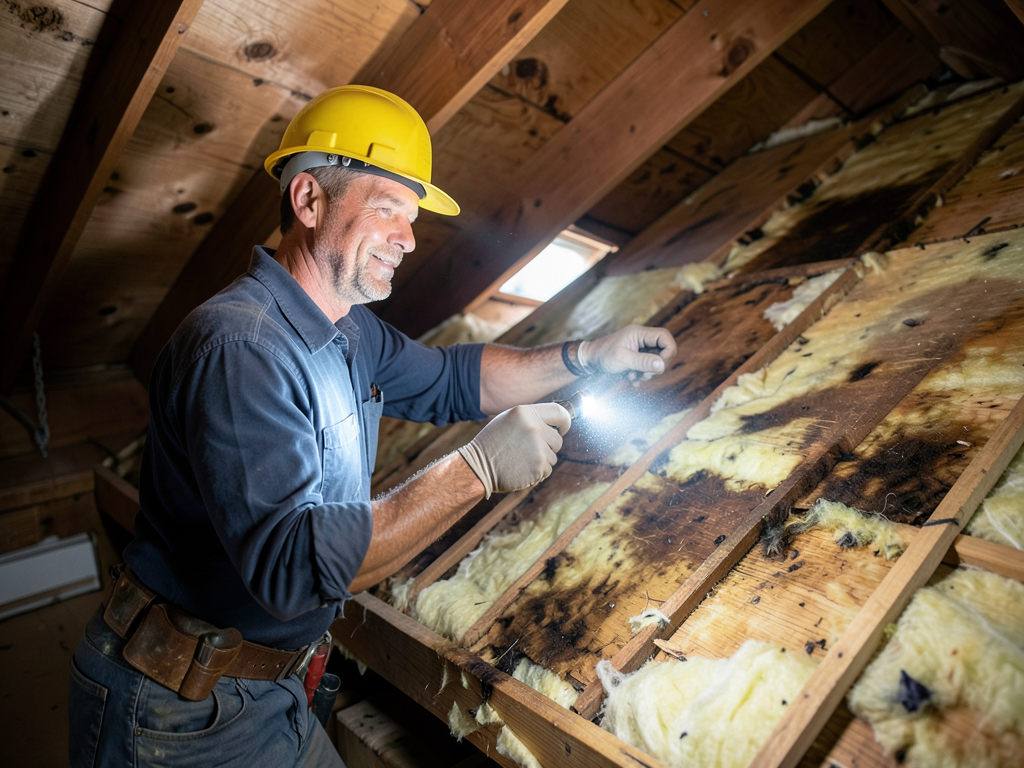
Attic inspection showing moisture stains on roof sheathing and damp insulation—common indicators of ventilation problems in St. Louis homes
Why St. Louis Homes Suffer from Attic Moisture
St. Louis’s climate creates perfect conditions for attic moisture problems. Understanding the science helps you address the root causes rather than just treating symptoms.
The Summer Humidity Factor in the Midwest
St. Louis sits in a unique meteorological zone where Gulf moisture meets continental air masses. Summer relative humidity often exceeds 75%, and dew point temperatures regularly hit the mid-70s. When warm, moisture-laden air enters your cooler attic space, it reaches its dew point and releases water vapor as condensation.
Think of your attic like a cold drink on a hot day. The can sweats because warm air contacts a cold surface. Your attic roof deck acts the same way when attic temperatures drop below the dew point of incoming air.
Winter Ice Dams and Heat Loss
Missouri winters create another moisture pathway through ice dam formation. When heat escapes through your ceiling into the attic, it melts snow on the roof. This water runs down to the colder eaves and refreezes, creating ice dams that force water under shingles.
The Missouri Building Code (Section R806.2) requires specific ice dam protection in our climate zone. Homes built before 2012 often lack this protection, leading to water infiltration during freeze-thaw cycles common in St. Louis winters.
Inadequate Soffit and Ridge Ventilation
Proper attic ventilation follows the 1/300 rule—one square foot of net free ventilation area for every 300 square feet of attic floor space. Many St. Louis homes, especially those built before 1990, have inadequate ventilation systems.
Blocked soffit vents from insulation or animal nests prevent fresh air intake. Missing or undersized ridge vents fail to create proper exhaust flow. The result? Stagnant air that traps moisture and heat.
The Science: How Improper Insulation Leads to Mold
Attic moisture problems often start with what’s happening below your ceiling. Understanding thermal bypasses and the stack effect explains why some homes develop severe moisture issues while neighbors remain dry.
The stack effect describes how warm air rises through your home. In winter, heated air moves upward, escaping through ceiling penetrations like light fixtures, attic access doors, and plumbing vents. This creates negative pressure that draws in cold air from below.
Each penetration becomes a thermal bypass—a pathway for warm, moist air to enter your attic. Common bypasses include:
- Recessed can lights without airtight baffles
- Attic access hatches without weatherstripping
- Plumbing vent stacks passing through the attic
- Wires and electrical penetrations
- Chimney chases without proper sealing
When this warm air hits your cold roof deck, condensation forms. Over time, this creates the perfect environment for mold species common in the Missouri River Valley, including Aspergillus and Penicillium varieties that thrive in our specific humidity ranges.
Recommended Solutions for Missouri Homeowners
Fixing attic moisture requires a systematic approach. Here’s the proven process that works for St. Louis homes: Fixing Wind and Storm Damage Before It Ruins Your St. Louis Home.
Step 1: Professional Attic Assessment
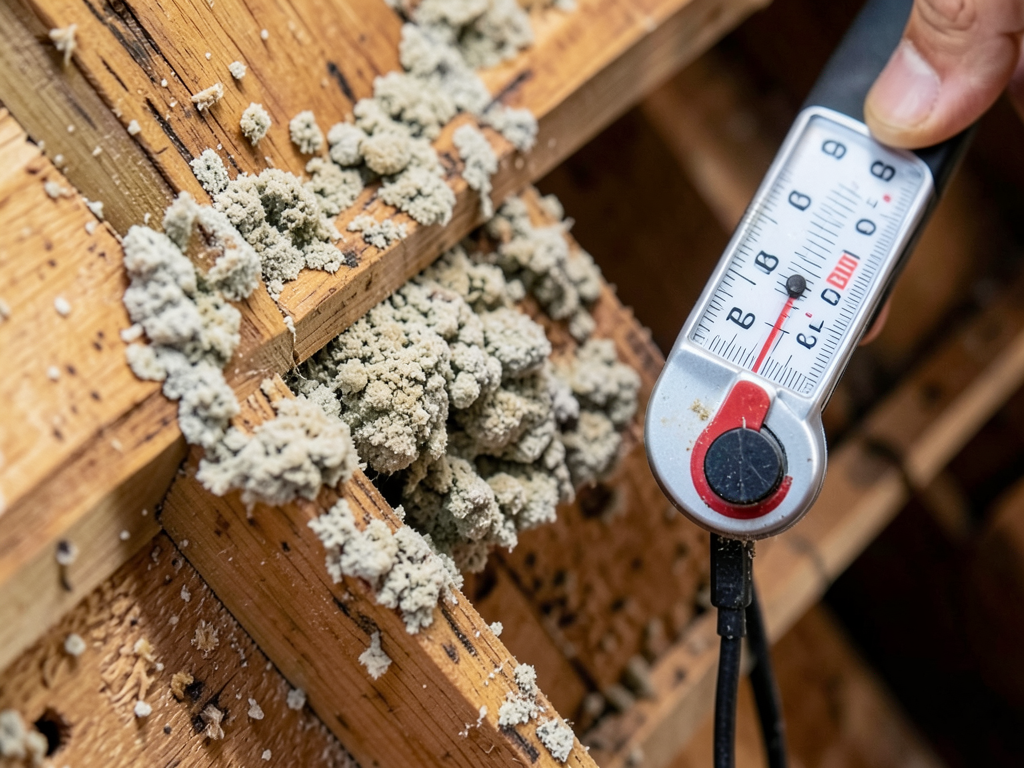
Before making changes, you need accurate data. A professional assessment includes:
- Moisture meter readings on roof decking (target: below 18% moisture content)
- Infrared scanning to identify thermal bypasses
- Ventilation flow testing to measure intake vs. exhaust
- Mold sampling if visible growth exists
During assessment, technicians use a moisture probe to test wood at multiple depths. Readings above 20% indicate active rot risk, while 15-20% suggests elevated moisture requiring intervention.
Step 2: Air Sealing Critical Penetrations
Air sealing stops the moisture transport mechanism. Use these materials for Missouri climate conditions:
- Fire-rated caulk for electrical penetrations
- Expanding foam for larger gaps around plumbing
- Airtight baffles for recessed lights
- Weatherstripped covers for attic access points
Pay special attention to chimney chases. The National Fire Protection Association (NFPA 211) requires specific clearance around masonry chimneys, making proper sealing critical for both safety and moisture control.
Step 3: Optimizing Ventilation Systems
Calculate your ventilation needs based on attic square footage. For a 1,500 sq ft attic:
- Required net free area: 5 sq ft total (1,500 / 300)
- Intake vents (soffit): 60% = 3 sq ft
- Exhaust vents (ridge): 40% = 2 sq ft
Common ventilation upgrades include:
- Installing continuous ridge vents along the roof peak
- Adding baffled soffit vents to prevent insulation blockage
- Removing gable vents that interfere with proper airflow
- Installing powered attic fans for homes with complex rooflines
Step 4: Insulation Improvements
St. Louis falls in IECC Climate Zone 4, requiring R-49 to R-60 attic insulation. Many older homes have only R-19 to R-30, creating thermal bridging and moisture problems.
Recommended insulation strategies:
- Blown-in cellulose for existing attics (higher density resists settling)
- Fiberglass batts for DIY accessibility
- Closed-cell spray foam for severe moisture problems
Never block soffit vents with insulation. Use rafter baffles to maintain clear airflow channels from eaves to ridge.
Step 5: Addressing Existing Mold
If mold is present, follow EPA guidelines for remediation. For areas under 10 square feet, DIY cleaning with proper safety equipment may suffice. Larger infestations require professional remediation.
Effective mold treatment includes:
- HEPA vacuuming affected surfaces
- Applying EPA-registered fungicidal coatings
- Encapsulating treated areas to prevent regrowth
- Addressing the moisture source to prevent recurrence
Attic Moisture Prevention Checklist
Prevention is always cheaper than remediation. Use this checklist to maintain a healthy attic environment:
- Annual Inspection Schedule
Check your attic every spring and fall. Look for new moisture stains, check insulation levels, and verify vent screens are intact.
- Humidity Monitoring
Install a hygrometer in your attic. Target humidity levels between 30-50%. Readings consistently above 60% indicate ventilation problems.
- Exhaust Fan Verification
Ensure bathroom and kitchen exhaust fans vent fully outside, not into the attic. Check duct connections annually.
- Roof Leak Prevention
Inspect roof penetrations (chimneys, vents, skylights) annually. Replace cracked rubber boots and damaged flashing before leaks develop.
- Ice Dam Protection
Install heat cables in problem areas and ensure proper attic insulation to prevent heat loss that causes ice dams.
When to Call a Professional
Some attic moisture problems require expert intervention. Contact a professional if you notice:
- Visible mold covering more than 10 square feet
- Musty smells that persist after cleaning
- Water stains spreading across ceiling areas
- Structural concerns like sagging roof decking
- Recurring ice dam formation
Professional assessment becomes critical when dealing with historic St. Louis homes. Many properties in neighborhoods like Soulard, Lafayette Square, and the Central West End have unique construction methods that require specialized knowledge.
Cost Factors for Attic Moisture Solutions
Attic moisture remediation costs vary based on severity and required solutions. Here’s what influences pricing:
| Solution Type | Typical Cost Range | Complexity Factor |
|---|---|---|
| Basic Ventilation Upgrade | $800 – $2,500 | Low – Moderate |
| Air Sealing Package | $1,200 – $3,500 | Moderate |
| Professional Mold Remediation | $2,000 – $8,000+ | High |
| Complete Attic Retrofit | $5,000 – $15,000+ | Very High |
Most homeowners find that addressing ventilation and air sealing provides the best return on investment, often solving 80% of moisture problems at 40% of the cost of full remediation.
Frequently Asked Questions
How do I know if my attic moisture problem is serious?
Look for multiple warning signs: musty smells, visible mold, water stains, or condensation on roof decking. If you notice two or more symptoms, especially during humid weather, the problem likely requires professional attention.
Can I fix attic moisture problems myself?
DIY solutions work for minor issues like adding vent baffles or sealing obvious air leaks. However, complex problems involving mold remediation, structural repairs, or ventilation redesign should be handled by professionals to ensure proper code compliance and effectiveness. Who to Call for 24 Hour Roof Repairs Anywhere in St. Louis.
How long does attic moisture remediation take?
Simple ventilation upgrades take 1-2 days. Comprehensive solutions including air sealing, insulation, and minor repairs typically require 3-5 days. Full mold remediation with structural repairs can extend to 1-2 weeks depending on severity.
Will improving my attic ventilation increase my energy bills?
Properly designed attic ventilation actually reduces energy costs by preventing heat buildup in summer and moisture problems in winter. The initial investment typically pays for itself within 2-3 years through improved HVAC efficiency and prevented damage.
What’s the best time of year to address attic moisture in St. Louis?
Spring and fall offer ideal conditions for attic work. Summer heat makes working conditions difficult, while winter cold can affect material performance. Plan your project during mild weather for best results and contractor availability.
The musty attic smell that bothers you during St. Louis summers is more than just an odor—it’s a warning sign of moisture problems that can destroy your home’s structure and air quality. By understanding the unique challenges our climate creates and taking systematic action to improve ventilation, air sealing, and insulation, you can eliminate that smell and protect your investment for years to come. High Quality Roof Replacements for Creve Coeur Properties.
Don’t wait until visible mold or water damage forces emergency repairs. The cost of prevention is always less than the cost of remediation. If you’re noticing musty odors, seeing moisture stains, or concerned about your attic’s health, professional assessment can identify problems before they become disasters.
Call (314) 417-7774 today to schedule your attic moisture assessment. Our St. Louis-based experts understand the specific challenges our climate creates and can recommend solutions that work for your home’s unique construction and your family’s needs. Don’t let another humid summer damage your home—take action now and breathe easier knowing your attic is healthy and protected.
Professional attic inspection using thermal imaging to identify moisture hotspots and thermal bypasses—critical diagnostic tools for St. Louis homes
Before and after comparison showing improved attic ventilation with proper ridge vent installation and baffled soffit vents for optimal airflow For more information, visit Department of Energy Attic Insulation Guide.
{
“@context”: “https://schema.org”,
“@type”: “BlogPosting”,
“headline”: “Dealing with Musty Attic Smells During a Humid St. Louis Summer”,
“description”: “Musty attic smells in St. Louis homes? Discover the hidden causes, from humidity to poor ventilation, and learn proven solutions to protect your home from mold and damage.”,
“wordCount”: 1971,
“datePublished”: “2026-03-29T06:33:00.000Z”,
“dateModified”: “2026-03-29T06:33:00.000Z”,
“inLanguage”: “en-US”,
“mainEntityOfPage”: {
“@type”: “WebPage”,
“@id”: “https://pioneerroofingstlouis.com”
},
“publisher”: {
“@type”: “LocalBusiness”,
“name”: “Pioneer Roofing St. Louis”,
“url”: “https://pioneerroofingstlouis.com”
},
“author”: {
“@type”: “Organization”,
“name”: “Pioneer Roofing St. Louis”,
“url”: “https://pioneerroofingstlouis.com”
},
“image”: {
“@type”: “ImageObject”,
“url”: “https://pioneerroofingstlouis.com/wp-content/uploads/2026/03/dealing-with-musty-attic-smells-during-a-humid-st-1.png”
}
}
{
“@context”: “https://schema.org”,
“@type”: “RoofingContractor”,
“name”: “Pioneer Roofing St. Louis”,
“url”: “https://pioneerroofingstlouis.com”,
“address”: {
“@type”: “PostalAddress”,
“addressLocality”: “St. Louis”
},
“areaServed”: {
“@type”: “City”,
“name”: “St. Louis”
}
}
{
“@context”: “https://schema.org”,
“@type”: “FAQPage”,
“mainEntity”: [
{
“@type”: “Question”,
“name”: “How do I know if my attic moisture problem is serious?”,
“acceptedAnswer”: {
“@type”: “Answer”,
“text”: “Look for multiple warning signs: musty smells, visible mold, water stains, or condensation on roof decking. If you notice two or more symptoms, especially during humid weather, the problem likely requires professional attention.”
}
},
{
“@type”: “Question”,
“name”: “Can I fix attic moisture problems myself?”,
“acceptedAnswer”: {
“@type”: “Answer”,
“text”: “DIY solutions work for minor issues like adding vent baffles or sealing obvious air leaks. However, complex problems involving mold remediation, structural repairs, or ventilation redesign should be handled by professionals to ensure proper code compliance and effectiveness. Who to Call for 24 Hour Roof Repairs Anywhere in St. Louis.”
}
},
{
“@type”: “Question”,
“name”: “How long does attic moisture remediation take?”,
“acceptedAnswer”: {
“@type”: “Answer”,
“text”: “Simple ventilation upgrades take 1-2 days. Comprehensive solutions including air sealing, insulation, and minor repairs typically require 3-5 days. Full mold remediation with structural repairs can extend to 1-2 weeks depending on severity.”
}
},
{
“@type”: “Question”,
“name”: “Will improving my attic ventilation increase my energy bills?”,
“acceptedAnswer”: {
“@type”: “Answer”,
“text”: “Properly designed attic ventilation actually reduces energy costs by preventing heat buildup in summer and moisture problems in winter. The initial investment typically pays for itself within 2-3 years through improved HVAC efficiency and prevented damage.”
}
},
{
“@type”: “Question”,
“name”: “What’s the best time of year to address attic moisture in St. Louis?”,
“acceptedAnswer”: {
“@type”: “Answer”,
“text”: “Spring and fall offer ideal conditions for attic work. Summer heat makes working conditions difficult, while winter cold can affect material performance. Plan your project during mild weather for best results and contractor availability.”
}
}
]
}
{
“@context”: “https://schema.org”,
“@type”: “HowTo”,
“name”: “Attic Moisture Prevention Checklist”,
“step”: [
{
“@type”: “HowToStep”,
“position”: 1,
“name”: “Annual Inspection Schedule”,
“text”: “Check your attic every spring and fall. Look for new moisture stains, check insulation levels, and verify vent screens are intact.”
},
{
“@type”: “HowToStep”,
“position”: 2,
“name”: “Humidity Monitoring”,
“text”: “Install a hygrometer in your attic. Target humidity levels between 30-50%. Readings consistently above 60% indicate ventilation problems.”
},
{
“@type”: “HowToStep”,
“position”: 3,
“name”: “Exhaust Fan Verification”,
“text”: “Ensure bathroom and kitchen exhaust fans vent fully outside, not into the attic. Check duct connections annually.”
},
{
“@type”: “HowToStep”,
“position”: 4,
“name”: “Roof Leak Prevention”,
“text”: “Inspect roof penetrations (chimneys, vents, skylights) annually. Replace cracked rubber boots and damaged flashing before leaks develop.”
},
{
“@type”: “HowToStep”,
“position”: 5,
“name”: “Ice Dam Protection”,
“text”: “Install heat cables in problem areas and ensure proper attic insulation to prevent heat loss that causes ice dams.”
}
],
“image”: “https://pioneerroofingstlouis.com/wp-content/uploads/2026/03/dealing-with-musty-attic-smells-during-a-humid-st-1.png”
}
{
“@context”: “https://schema.org”,
“@type”: “BreadcrumbList”,
“itemListElement”: [
{
“@type”: “ListItem”,
“position”: 1,
“name”: “Home”,
“item”: “https://pioneerroofingstlouis.com”
},
{
“@type”: “ListItem”,
“position”: 2,
“name”: “Blog”,
“item”: “https://pioneerroofingstlouis.com/blog”
},
{
“@type”: “ListItem”,
“position”: 3,
“name”: “Dealing with Musty Attic Smells During a Humid St. Louis Summer”
}
]
}
{
“@context”: “https://schema.org”,
“@type”: “Service”,
“serviceType”: “Roofing”,
“provider”: {
“@type”: “LocalBusiness”,
“name”: “Pioneer Roofing St. Louis”,
“url”: “https://pioneerroofingstlouis.com”
},
“areaServed”: {
“@type”: “City”,
“name”: “St. Louis”
},
“description”: “Musty attic smells in St. Louis homes? Discover the hidden causes, from humidity to poor ventilation, and learn proven solutions to protect your home from mold and damage.”
}